Getting started tutorial with Java
This tutorial explains how to connect a Java based device to Lhings to create interesting applications with it. Before trying, make sure you have created a user account in Lhings (http://lhings.com).
This tutorial applies to version 2.0 (release ja007) and later of the Java Lhings library.
Quick start
Installing
The Lhings Java library is available as a Maven dependency. To use it add the following dependency to your pom.xml:
<dependency>
    <groupId>com.lhings.java</groupId>
    <artifactId>lhings-java</artifactId>
    <version>2.0</version>
</dependency>
If you're new to Maven, you can read a quick introduction here.
If you prefer to add the Lhings Java library manually to your project, you can download it from Maven Central. Bear in mind that in this case you will need to manually download also its dependencies! We encourage you to use Maven.
Hardware requirements
Are we talking about Java and devices? Yes! Embedded devices? YES!
The Lhings Java library will run smoothly on any Raspberry Pi board with the Java distribution that comes with Raspbian. But not all devices are as powerful as the Raspberry. You can run the library even in hardware constrained devices, because it is compatible with Java Embedded SE 8 profile compact1, which only needs 11 MB. Learn more about Java Embedded SE and compact profiles.
If your device is not a Raspberry Pi, but it has an ARM processor, it is very likely you will be able to run the Java library on it.
If you run the library on some of this devices, let us know.
Basic Concepts
This section is intended to provide a quick intro to the main concepts of Lhings for those who are new to it, or who have reached this section directly through a web search or following a link from a third party web. If you have read the introductory documentation of Lhings you can safely skip this section and go directly to Getting started below.
What is Lhings?
In brief, Lhings is a platform which provides connectivity features to your devices through the internet. Using Lhings you can easily receive information from your devices and control them remotely. You can even delegate the control of some devices to others, so that your own ecosystem of things works automatically.
What is a device in Lhings?
Basically, a Device is a physical object which can perform a set of actions, and can notify about the occurrence of some events. A sensor, an actuator, a ball, a computer, a table and a button could interact among themselves whenever they connect to internet and communicate to Lhings. Would you like your Device to communicate to Lhings? We tell you how!
Actions, events and statuses
Device operation and interaction capabilities are defined through actions and events. As an example, suppose you have an alarm clock connected to Lhings and was set to ring at 12:00h. An event would be the notification the alarm clock generates when it triggers at 12:00h, while an action would be to make it ring under the reception of a command or order. The status of the alarm clock could be the time it is currently reporting. Device actions and events can be customized and edited through its descriptor. This is described in detail further in this tutorial.
What is a Rule in Lhings?
Rules are relationships between events and actions that allow the interaction among different Devices. This refers to: when an event occurs, then do that action. You can create and edit your own Rules in your dashboard and automate their interaction.
Getting started
In this tutorial we are going to get a taste of the basic usage of Lhings by creating a simple Java program that simulates an oven. Then, you will be able to control it remotely and create new rules from your dashboard. You will see how easy it is to connect your device to Lhings, set its actions and events, and start programming your own Internet of Things applications.
You also will need a Lhings user account (don't have one? Sign up).
You can also read the javadoc of the library.
Anatomy of the Java library
The main class you of the library is LhingsDevice.
Any device created with the library will be encapsulated in a Java class that extends LhingsDevice.
You also have to implement two methods:
setup(): this method will be called by the library during initialization. Put here all the code you need to initialize your device (e. g. open database connections).loop(): this method is called continuously by the library, thus is the place where your main program logic should be.
If you're familiar with Arduino programming, you will find this pretty straightforward. You can change the frequency at which loop() is called using the method
LhingsDevice.setLoopFrequency(). Its default value is 10 Hz.
A device in Lhings is characterized by its actions, events and status. You define them in your class using the annotations @Action, @Event and @StatusComponent. During initialization, the library will scan your code looking for this annotations and will inform Lhings about the capabilities of your device. Using this information Lhings will be able to build automatically the control panel for your device, so that you can control it and retrieve information from it remotely.
Actions: an action is something your device does, so there should be code for it. You must put the code of each of the actions of your device in a method, and annotate that method with the
@Actionannotation, like in this example:@Action(argumentNames = {}) public void readSensor() { // ... code that reads the sensor goes here }
TheargumentNamesparameter is mandatory. You can also provide a name and a description for the method, but that's optional. If not provided, defaults are used. The arguments of the method can be of type int, float, double, boolean, String and java.util.Date, and any of the corresponding wrapper types (the arguments of the actions are typed parameters).Events: an event is information the device sends about something that is happening. From the Lhings point of view its only immutable property is its name. Declaring an event of the device is as easy as declaring a
Stringfield and annotating it with@Event, like in this example:@Event (name = "threshold_temperature_reached") String foo;
Notice that the content of theStringfield is unimportant, the field is there only to declare the event. The name argument is optional, if omitted the name of the field is used to name the event. Thus, the above code is equivalent to:@Event String threshold_temperature_reached;
Any time your device needs to send an event, it can do so by calling the methodLhingsDevice.sendEvent("threshold_temperature_reached"). You can also send events with payload using this method.Status: the status tells us about the current status of the device. The status can be composed of several items, which we call status components. Declaring a status component is done with the annotation
@StatusComponent, like in this example:@StatusComponent float temperature;
The control panel of the device will show its status components. The field annotated with@StatusComponentcan be of type int, float, double, boolean, String and java.util.Date, and any of the corresponding wrapper types (the status components are typed parameters).
Once your code is annotated, even if loop() method is empty, your device will be ready to interact with Lhings. Upon initialization, the library will scan your code and use the annotations found to build the device descriptor and send it to Lhings, all of this without any work on your side. After this, your actions, events and status are "wired" to Lhings and ready to work remotely.
The Oven example
The best way to get a feeling of how it is programming with the Java library is through an example. In this tutorial we will create a simple oven in Java, which we will be able to control from the Lhings web interface.
The source code for this example can be found in Oven.java. The project can be directly imported in Netbeans or your favourite IDE.
Our oven will have the following features:
- One action, called bake, which will accept two integer parameters, the baking temperature and the baking time in minutes. It will be used to turn on the oven.
- One event, called finished, which will be generated when baking is finished.
- Three statuses, called temperature, targetTemperature and hot. temperature will reflect the instantaneous temperature of the oven and targetTemperature will have the value of the expected baking temperature. hot will be a boolean status telling us if the oven is still hot or not.
To create your device you have to extend the class LhingsDevice. The constructor of LhingsDevice has at least three parameters: your username and password, and the name you want to give to your device:
public Oven(String username, String password, String name) throws IOException, LhingsException {
    super(username, password, name);

    // ...

    }
Defining actions
After that you have to define the actions, events and status components of your device. Let's start with the action we want to define for the oven, the bake action:
@Action(name = "bake", description = "action used to bake food", argumentNames = {
        "temperature", "time"})
public void bake(int temperature, int minutes) {
    // ...
    // code that setups and starts baking
    // ...
    System.out.println("Baking started!");
    }
Only the argumentNames parameter of the @Action annotation is mandatory. Its value is an array of string with the names of the parameters, in the same order as declared in the method. name and description, used to identify and describe your action in the Lhings control panel, are optional and if not provided they will be setup with sensible defaults.
The method you annotate with @Action must return void, and may have up to eight arguments.
If you want your action to process the payload of an event, you may add the @Payload annotation. The payload annotation is used to tell the method that implements the action which of its arguments should be filled with the value of the payload.
Defining events
You define the events of your device using the annotation @Event. This annotation takes only one optional argument called name, that defines the name of the event:
@Event
String finished;
To make the oven tell the world it has finished baking, you only need to call the appropriate method:
public void loop() {
    if (isBakeFinished()) {
        sendEvent("finished");  // <-- the event is sent here
    }
Defining the status
The status of the device is made up of values, which we call status components. These values are typed parameters, and you can use up to eight of them. To define them you have to use the @StatusComponent annotation, specifying the name.
For instance, in the case of the oven the status component temperature is defined in this way:
@StatusComponent(name = "temperature")
    private int temperature;
where the name parameter of the annotation is optional.
Defining application logic
You can define your application logic in two places, the setup() and the loop() methods. setup() will be called only once after library initialization, when the device is connected to Lhings. It can be used to put there all initialization logic needed by your device.
 @Override
        public void setup() {
                // In setup() you perform all the initialization tasks your device needs
                System.out.println("Oven initialization completed...");
        }
The loop() method will be called continuously, once and again by the library. You should use the loop() method to provide all the logic of your device, e. g., sending events, updating status components, etc. By default, the frequency at which the loop method is executed is ten times per second, but in this example is set to 20 Hz using the method LhingsDevice.setLoopFrequency.
public static void main(String[] args) throws InterruptedException, IOException, LhingsException {
        // provide your the username and password of your own Lhings account
        LhingsDevice device = new Oven("user@example.com", "mypassword", "My New Oven with SDK v2");
        device.setLoopFrequency(20);
        device.start();
        Thread.sleep(360000);
        device.stop();
    }
The device is started and stopped using the methods LhingsDevice.start() and LhingsDevice.stop() respectively.
If you want your device to respond timely, loop() and the @Action annotated methods should execute as fast as possible. If possible execute long running tasks in another thread.
Let's play!
Compile the oven example and execute it. You will see some logs in the standard output. Now log into your Lhings account and go to the Devices section. You will see a new device called "My Oven" (or another name if you changed it).
Enter the control panel (click on the name of the device in the device list). You will see something similar to the screenshot below. All the status components you defined on your code now appear on the panel on the left, and the actions you defined appear in the panel on the right. You can execute any action and set the values of the arguments for it.
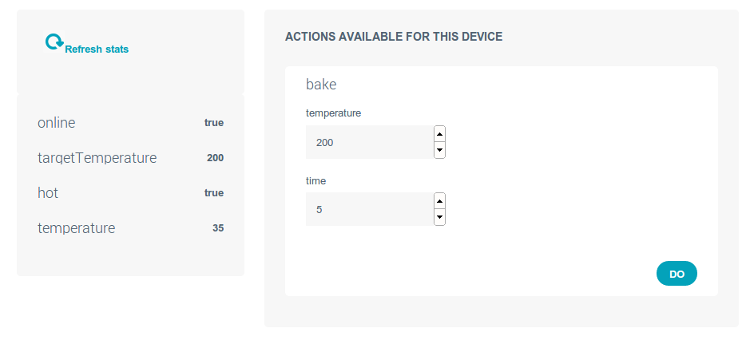
Set the temperature of the bake action to 200 and the time to 5 minutes. Click on "Do" and then wait a few seconds. Click now on "Refresh stats", and you will be able to see how the oven is warming up!
But you can do even more. Install the twitter app if you have not done it yet. Go to the rules section and create a new rule. Select the oven and its event finished as source of the rule, and the Twitter application as target of the rule, with its action send tweet. Now go to the oven control panel and bake again. When baking finishes you will be notified about it through Twitter!!
If you want to customize the message sent to Twitter, add a payload to it. You do so changing the sendEvent() method call like this:
if (isBakeFinished()) {
    sendEvent("finished", "Better baking with #Lhings ovens!");
}
Interacting with other devices
The Java library allows you to interact with other devices in the same account. Look at the method show() of the oven example to see how to do this. For example, you can get a list of all the devices in the account using the method LhingsDevice.getDevices(). Each Device instance in the list contains information about the devices, in particular their uuid. With these uuids you can interact with the devices through the methods LhingsDevice.getStatus(), and even command them to perform actions with LhingsDevice.requestAction().
Store data in Lhings
With the library you can store data in Lhings easily using them method LhingsDevice.storeStatus(). This method will get the values of all the status components of the device and store them in Lhings, in the same way as if you have used the service Status.store of the Data API.
What have we learnt
Important lessons to keep in mind:
- In Lhings a device is something that can perform actions and can send events.
- To create a Java Lhings device you have to extend the class
LhingsDevice. - You define the actions, events and statuses of your device by means of the annotations
@Action,@Eventand@Stats. - Put your device logic in the methods
setup()andloop(). - You can chain events of your devices or apps with their actions using rules.
You tasted it and still want more? Keep on reading our next tutorial!!